How to Use a Clapperboard Like a Pro

Whether you’re new to filmmaking or a seasoned pro, you’ve likely seen a clapper board in action.
But do you know how to use it correctly to make your film set run smoother?
Let’s dive into everything you need to know about using a clapper board effectively!
What is a Clapper Board?
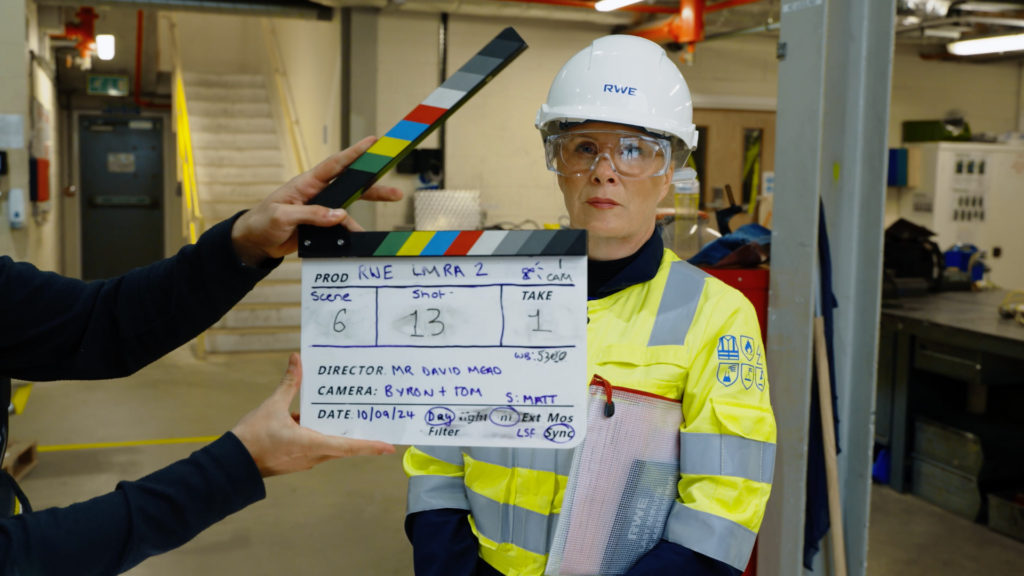
A clapper board, also known as a slate, is indispensable for organizing shots and syncing audio with video during post-production. It marks different scenes, camera setups, and takes, making it an editor’s best friend.
Understanding the Sections of a Clapper Board
A typical clapper board contains essential information that helps streamline the editing process. Here’s what each section means:
Production Information – This includes the title of the production and sometimes the director or camera operator’s name. It helps identify the project when footage is being reviewed.
Roll – The roll number indicates which roll of film is being used. In digital filmmaking, it refers to the media file. If multiple cameras are used, letters can be added to distinguish them.
Scene – A quick reference for editors to know which part of the script is being shot.
Shot – Since multiple shots can be taken in a scene, the shot number changes whenever the camera is moved to a new angle.
Take – The number of times a particular shot has been filmed.
Date – Helps organize footage during post-production.
The Clapper/Slate – The iconic part that provides the sound and visual cue needed to sync audio with video.
Pro Tips for Using a Clapper Board Effectively
1. Make the Board Legible
Write neatly using a dark, bold whiteboard pen. A well-presented board makes it easier for the editor to read, saving valuable time in post-production.
2. Always Have the Board Ready
The clapper board should fill the frame when marking the shot. Position it at an appropriate distance based on the lens being used—about 5 feet away for a 50mm lens. The goal is to ensure the first frame clearly shows the clapper board, reducing the time editors spend searching for it.
3. Read Only What Matters
There’s no need to read the entire board aloud—the editor already knows what production they’re working on. Wait for sound to roll, then state the scene, shot, and take number. Clap when the First AD calls “mark.”
4. Track Multiple Takes Properly
Stay on top of the scene, shot, and take numbers as the shoot progresses. Some 2nd Assistant Cameras cross out the previous take after each new clap to keep track, avoiding confusion.
5. Ensure Visibility in Low Light
If filming in dim environments, carry a small torch to illuminate the clapper board. This ensures that the details remain visible for both the crew and editor.
6. Master the One-Handed Clap
A seasoned professional can clap the board with one hand, keeping the other free for additional tasks. It’s a subtle yet effective skill that adds to efficiency on set.
Wrapping Up
Using a clapper board correctly can significantly improve the efficiency of your film set and post-production workflow.
Whether you’re an assistant or a director, mastering this tool ensures smooth operations from set to screen.
Now that you have the inside scoop on using a clapper board like a pro, it’s time to put your skills to the test!
Find out more about what it’s like to work behind the scenes of a video production shoot:
+44 (0)113 288 3245 | [email protected]